Welcome! As I am in the process of patching up my website, it seems appropriate to dispose of the tumbleweeds on my blog page. Luckily, my recent participation in the US Amateur Team East (USATE) event provides an easy opportunity to make my first post.
USATE is a historically large and fun event. There are no money prizes, so players’ motivation to make the trek to New Jersey is sure to be fueled by a desire to compete with their friends on a team and reunite with other chess acquaintances (unless one has a major urge to win a chess clock and a plaque). As usual, rating and bragging rights are on the line.
The “being on a team with your friends” aspect of the event was an integral component to my participation. Only a couple of weeks before Parsippany (town where USATE has been held in recent years) had the formidable squad “University of Hooztri Chess Team B” (not a real school!) been assembled, consisting of:
- Yours Truly (2465)
- Levy Rozman (2350)
- Alexis Paredes (2150)
- Katrina Wong (1486)
…for an average rating of 2111.
Seeded 42nd in the event, our first round pairing was against against a modest 1800 rated team. However, this was not a team of four 1800s, but actually the Fishbein family, led by Grandmaster Alex Fishbein (2583)! I had once read in GM Joel Benjamin’s book American Grandmaster that manning the prestigious first board has its ups and downs: expressed in an anecdote where the US team faces off against Columbia, Benjamin is left battling Grandmaster Alonso Zapata while the other boards “take out 3 extras from Scarface.” Jokes aside, I was quite happy to start off my event against a strong opponent; it would have certainly been less productive to play someone 600 points lower rated than me. Nevertheless, boards 2-4 finished quickly with a 3-0 score whilst I was left to struggle alone.
Round 1, Team Hooztri vs. Team Fishbein
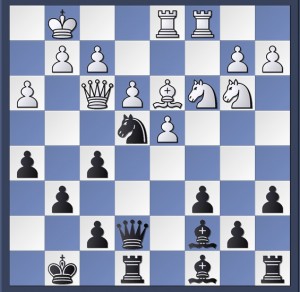
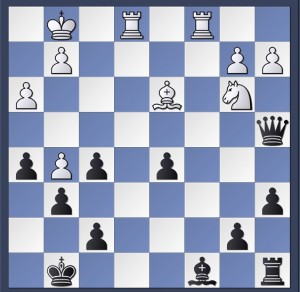
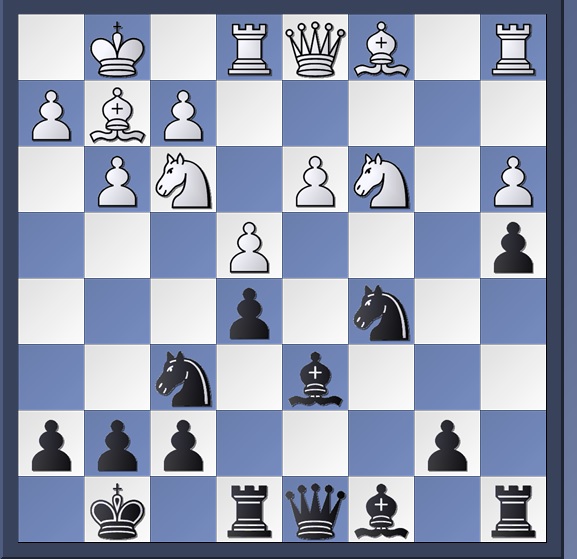
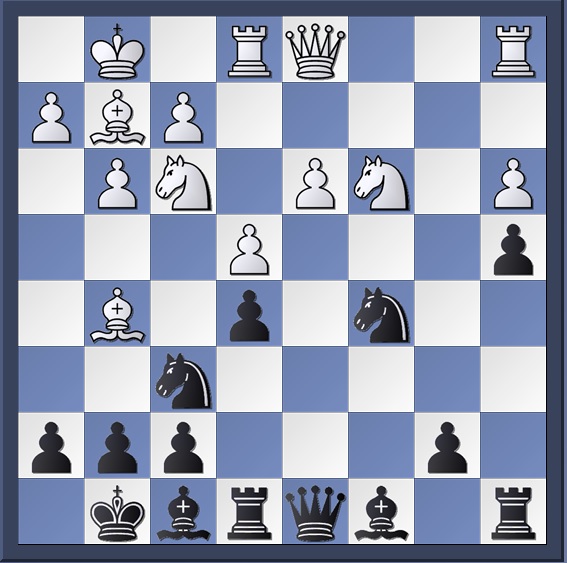
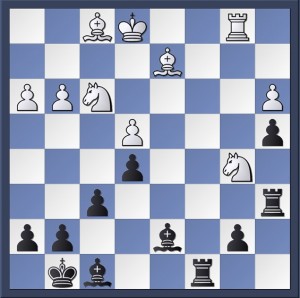
The game began in a sedate manner, but quickly became very pleasant for me as we reached the following position:
Fishbein-Ostrovskiy
A critical position in the game for me, and one where I spent an obscene 32 minutes or so. Obviously Black is for choice: White is saddled with problem pawns on a3 and d3, while I have an outpost on b3 and a potentially handy initiative on the queenside once I develop my pieces. The question is how to best develop here. A sensible continuation may begin with the tempting 15…Nb3 16. Rb1. Now reaching for the two bishops with 16…Nxc1 17. Qxc1 is theoretically appealing, but White’s pressure on the queenside makes it tricky for me to unravel. The computer offers the alternative 16…Qa5, hinging on the tactical variation 17. Nxa4 Nxc1 18. Nb6 Na2! 19. Nxa8 Qxa8, and my wayward steed is hard to capture because of a timely Be6 or even Qxa3. This tricky variation escaped me, and in my attempts to come up with a “convincing” and forcing conversion of my pluses I played:
15…Bf8
….which is almost a good move. The point is a lame response such as 15. Bf1 will allow me to develop with tempi e.g 15…Nb3 16. Rb1 Bg4 17. Bg2 Qa5 and with Black’s development running smooth (Rfd8, Rac8 is coming) White has every right to be very sad.
However it didn’t take Fishbein long to play
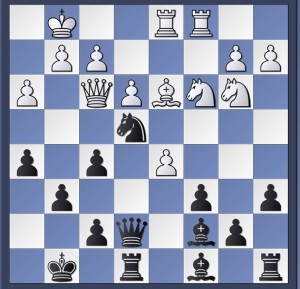
16. Bg5!
Position After 16. Bg5!
The sickling on d3 is a small price to pay in order to avoid the nasty bind seen after 16. Bf1? Now I can’t say I missed Bg5, but I also can’t say I expected it, which is rather silly as it is White’s only move.
16…Qxd3
Greed is good
17. Qxd3
I didn’t think 17.Bxf6 was an option, but it is a serious move. Now after 18…Qxc3 the position becomes complex on account of 19. Bxe5 [19. Re3 immediately is imprecise due to 19…Qa5 20. Bxe5 Nb3 21. Bc3 Qh5 22. Ra2 Be6, and after the forcing continuation Black is ready to bring out his rooks while White will struggle due to worse piece placement and the weak a3 pawn], but a cunning antidote could be found in 18…Qxd1! 19. Raxd1 gxf6 20. Nd5 Re6! 21. Nc7 Rb8 22. Nxe6 Bxe6, when 2 bishops, control of the dark squares and queenside play easily outweigh the small material deficit. A similar exchange sacrifice could be found in the notes to the game’s 18th move.
17…Nxd3
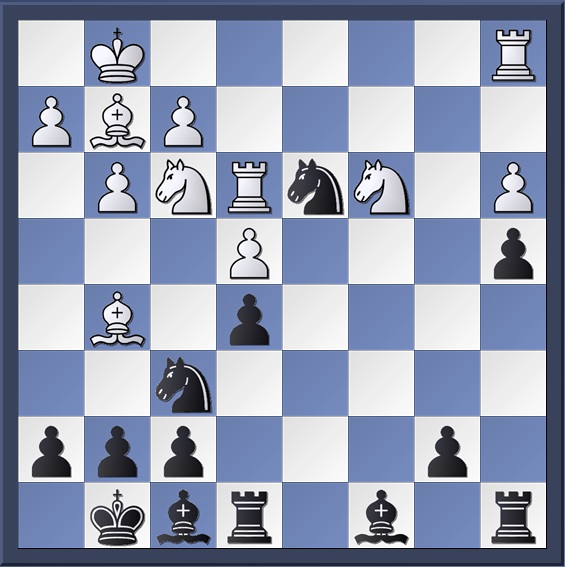
18. Re3!?
18. Red1 was what I was expecting, when my 32 minute think produced the variation 18…Nb2 19.Rdb1 Nc4 20. Bxf6 gf 21. Nd5 Re6 22. Nc7 Rb8! when after 23. Nxe6 Bxe6, the a3 pawn falls and an extra exchange offers White small consolation after the a+b pawns come rushing down the board. A cute idea we’ve seen in the notes above, but White’s play could be improved. After 21…Re6 White can prefer 22. Bh3!, aiming to win the exchange in a more advantageous version. This position is OK as White is bringing an extra piece into the battle. Instead Black can prefer an earlier deviation with 21…Rd8! 22. Nxf6 Kg7 23. Nd5, when material is equal but the positional advantages are not. The computer offers to get sneaky with 23…Ra5!?, shooting for f5 ideas.
Not the end of the story! The variations indicate White himself should deviate earlier with 19. Rdc1, and now 19…Ra5! plans Be6 as e5 is defended while simultaneously developing (the rook can continue to c5) and escaping from future Knight forks in case of a subsequent Nd5.
Position After 18. Re3!?
18…Nxf2!?
As planned during my long think on move 15, this tactic looked simply irresistible. 18…Nc5 was calm and acceptable after 19. Bxf6 gf 20. Nd5 Rd8!, when the pawns may be about to become equal but the 2 bishops and queenside play promise Black an advantage. But Nf2 was very seductive….
19. Kxf2
19. Bxf6 Ng4! was a cute detail
19…Ng4+
20. Ke1 f6
21. h3 Nxe3
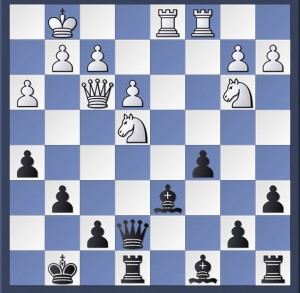
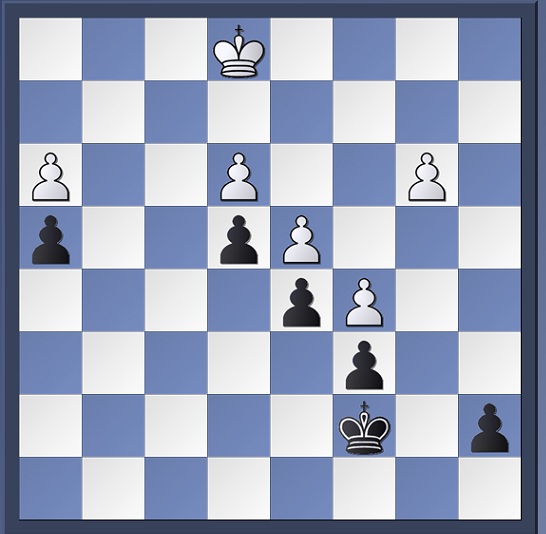
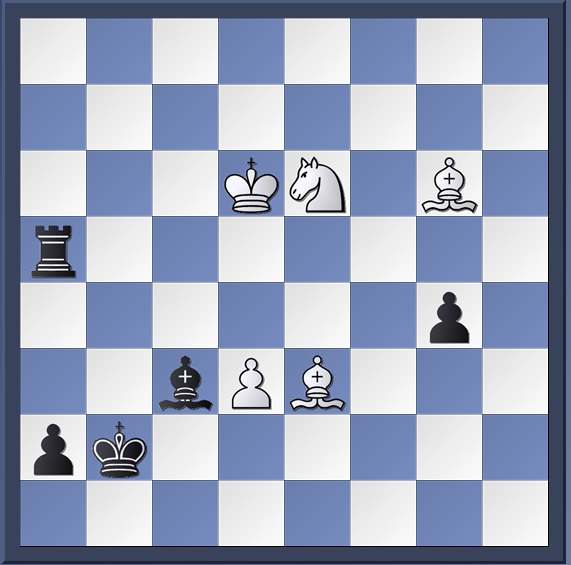
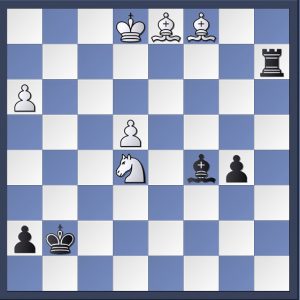
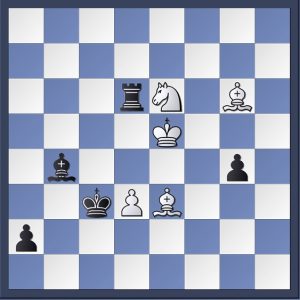
22. Bxe3 Be6
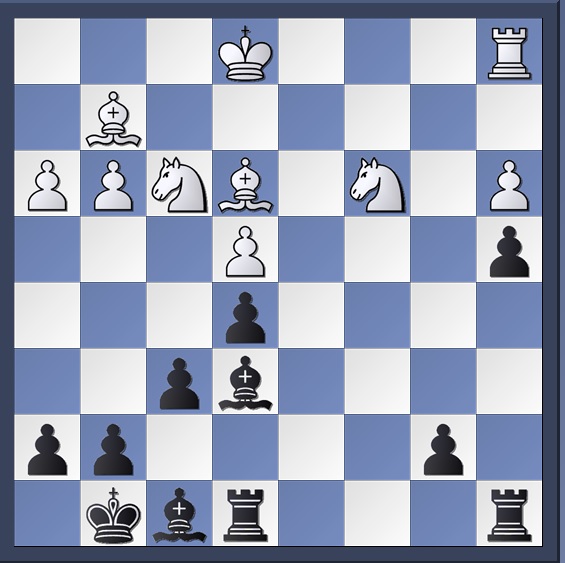
The dust has settled and the result is a material imbalance of R+2 vs N+N
Position After 22…Be6
This position arose more or less by force after 18…Nxf2. Of course it depends on the position, but usually R+2 is a decent investment for 2 pieces, especially if it is not 2 bishops. Here I am very comfortable. There are no weaknesses in my position as my pawns and bishops cover all the important squares. The 2v1 pawn majority on the queenside is very important, especially if one notices the passive presence of the a1 rook. My plan of action includes making headway on the queenside, but this can not be achieved without the proper development of my rooks. Another bonus about this position is that it is one where I am safely playing for 2 results, although I guess this evaluation did not take my propensity to make confounding moves into account.
24. Nb5 Bd7
24… Rc2! with the idea of Rac8 and perhaps Rb2-Rb3 was logical and consistent with my statements above. So logical that I can’t recall what spoooked me from playing this way.
25. Bd2 Ra6
A smart idea, intending Rb6. I was feeling pretty good…
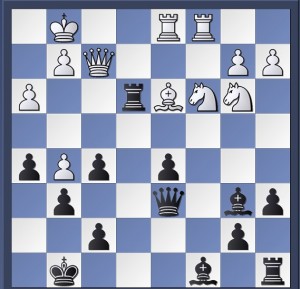
26. Rb1!
…but it turns out it is not so easy to make progress! Now Rb6 could be met with Ba5…so I went into a think, draining my precious minutes from 8 to 3.
Position After 26. Rb1!
26…Raa8
27. Ra1 Ra6
28. Ra1 Raa8
Begrudgingly going for a repetition. Although I could not think of an obvious way to make progress, I felt that if I was able to buckle down to study the position, then I could come up with an appropriate regrouping. Unfortunately I did not have such a luxury, so I prepared to call a ceasefire…
29. Bd3?!?!?!
What is this?! Even now looking at my scorebook I am reluctant to believe this move actually happened at the board. It is not that White avoids the repetition (my mulling had left me with 1 minute vs 9 minutes with 11 moves to go until I would receive my extra hour; although White can not objectively dream to win this), but this move simply leaves the h3 pawn en prise!! What did I do next move?
29…Bxb5?
Now what is this?! Through adrenaline or such, I blitzed out this nonsense, simply ignoring my opponent’s gift. Unfortunately, 29…Bxb5 really set the tone for my play the next 10 moves or so. Actually it is quite embarrassing to showcase the aforementioned continuation of the game, so it will be done with sparing annotations and with a look of shame.
30. Bxb5 Bxa3
31. Ra1 Be7?!
31….Bb2 32. Ra4 Ra4 33. Ba4 Bc3 is obvious as White will have better coordination with 3 minors as opposed to 2.
32. Rxa4 Rxa4
33. Bxa4 Kf8
At least no 33….Rc4 was played this game!
34. Bb3 Bc5
35. g4 b6?!
36. g5 Ra8
37. gxf6 Ra3?
Oh man….
38. fxg7+ Kg7
39. Bd1 b5
40. Bc1 Ra2
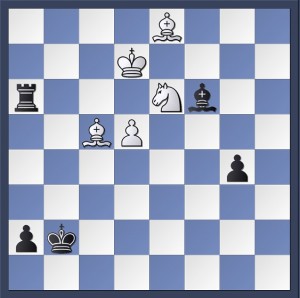
41. Nxe5
Position After 41. Nxe5
The time control has been reached, and my position is a far cry from what it once was long ago. Now, with an hour on the clock, it was time to settle down, relax, and make a draw.
41…Bd4?
41…Bb4+! was key, intending 42. Kf1 Bd2! 43. Bxd2 Rxd2 44. Bb3 b4. As mentioned before, White will better coordinate 3 pieces rather than 2. Here White will have a tough time making progress as the rook is active and the b-pawn creates a distraction. It’s also helpful that the h-pawn is not compatible with the bishop, so an exchange of the rook for the N+epawn would be an instant draw.
42. Nd3 Bc3+
43. Kf1 Rh2
44. Bf4?!
44. Bf3! Kept the h-pawn on the board since 44…Rxh3? 45. Kg2 signals the end of the rook’s days.
44…Rh1+?
I would pay good money for an explanation of this random tempo-loss.
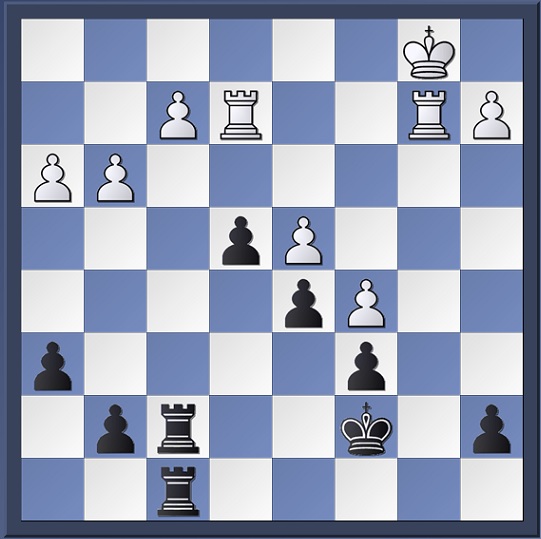
45. Ke2 Rxh3
 Position After 45…Rxh3
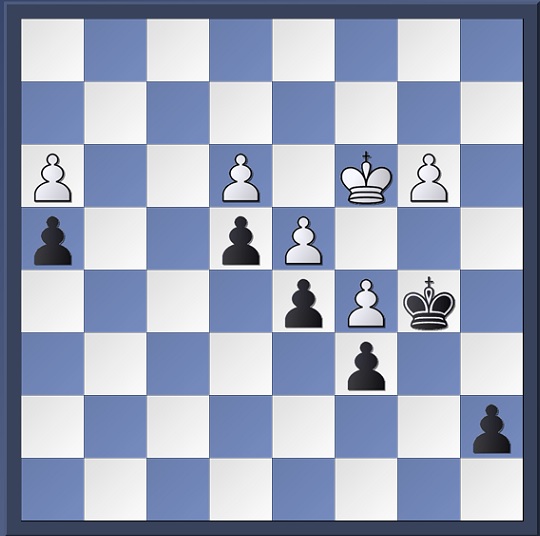
46. e5
The material is limited, but this does not stop the endgame from being very unpleasant to defend. I wouldn’t be surprised if the objective evaluation was a win for white. White aims to continue with Bb3, and then perhaps Be6-Bd7. Nothing is stopping White from prodding with his annoying bishops and pushing his e-pawn; it’s tough to formulate a cohesive plan of defense except “reactionary” moves against White’s threats.
46…Bd4
47. Bb3 Rh1?!
This move generates the computer’s disapproval, but even so it is difficult to come up with something. Be6 is coming, followed by Kf3-Ke4 and a timely lunge with the e pawn. Down the road I’ll have to give up my bishop for the pawn, resulting in a unique, but hopeless material imbalance (not even an imbalance, I’m just down material).
48. e6 Bf6
49. Be5
 Position After 49. Be5
49…Rh5
Prolonging the game. 49….Bxe5 50. e7! is GG, but now 50. e7? Rxe5! is an oops for White.
50. Bd6 Rh4
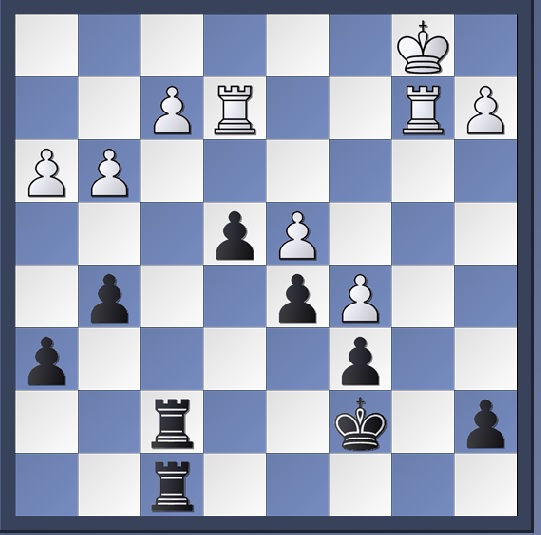
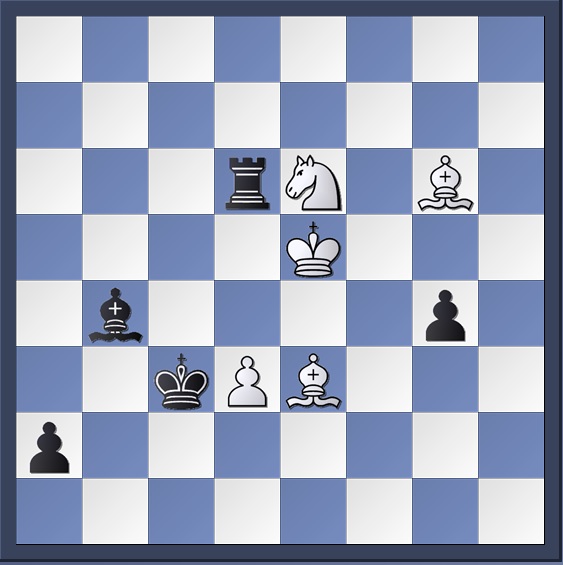
51. Ke3?
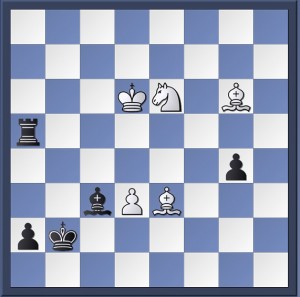 Position After 51. Ke3?
51. Nc5! would have been putting the last of the nails in the coffin as e7 is coming. Instead at the 5th hour of play my opponent makes a very costly mistake. Obviously fatigue is a factor here, but I should also mention that after 49. Be5 both opponents regarded the best move for Black as resignation. Instead, 49…Rh5 placed the game on a lifeline. Now although White still maintained a winning position, it was still a surprise that the game had not ended immediately. After the game my opponent said he had also missed 50…Rh4. Again this move does not objectively change the evaluation of the position, but psychologically it is unpleasant to discover the last line of resistance. In my opinion, these factors led to the mistake of 51. Ke3. Of course, this may not have been the case at all, but speaking from experience I have been in similar situations from the “aggressors” position.
51…Bg5+
52. Kf3 Rh3+
53. Ke4 Re3+
54. Kd4
Now it is already an achievement for me to find a more purposeful role for my rook on the e-file, and for example a natural move such as 54…Re2 could give me some chances of defending. However, there is an even better move to be found
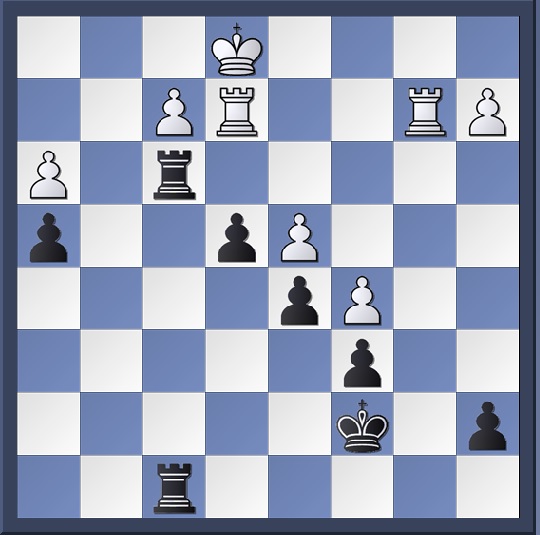
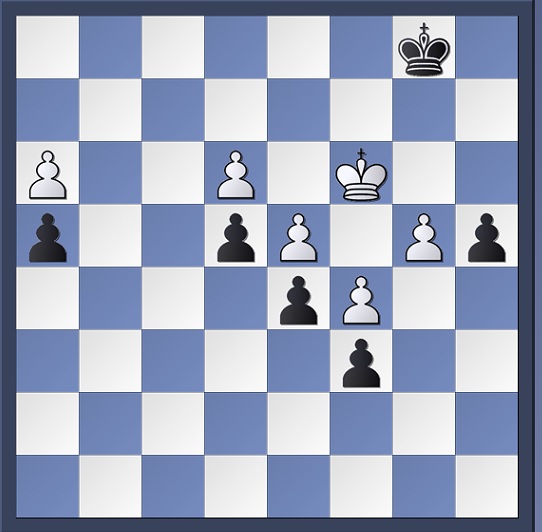
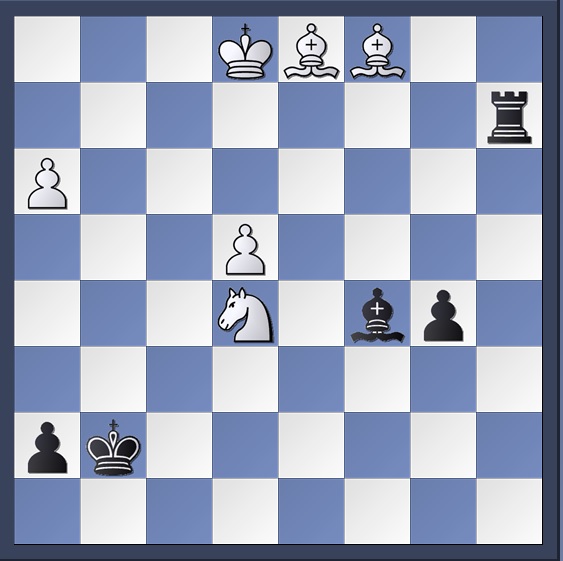
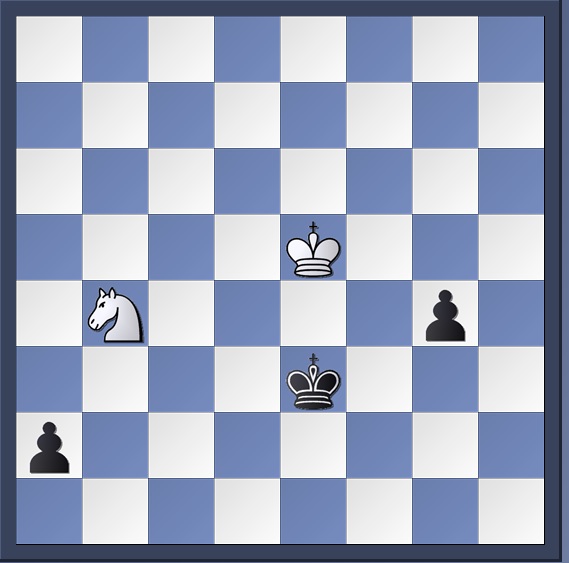
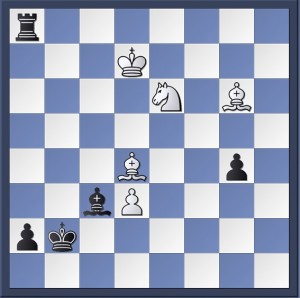
54…Kf6!
Position After 54…Kf6!
Now all of my pieces are successfully coordinated in the fight against the e-pawn! Already Rxe6 is threatened, and amazingly White can not escape the elimination of his main trump.
55. Ne5
Setting up the last trap. 55. e7 Rxe7 is easy. 55. Be5 Kf5 threatens Rxd3+. 55. Nc5 Rxb3 is no problem either.
55…Kf5!
Not 55…Rxb3?? 56. e7
56. Nf7
56. Ba2 Re2 57. Bb3 Re3 = or 56. Bd5 Re1, threatening Bf6.
56…Rxe6
57. Bxe6+ Kxe6
58. Nxg5 Kxd6
1/2-1/2
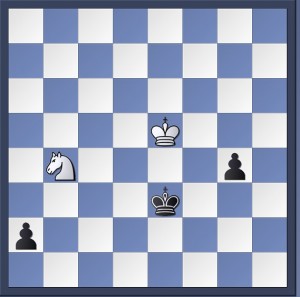 Final Position. Game Drawn
Whew! A long and interesting game despite a streak of truly poor moves by me. Nevertheless, in the end I could only be happy about escaping with half a point. Actually this game was really long, commencing at 1:00 and finishing at 7:20, leaving only a 10 minute window before the 2nd round game!
Our 2nd round pairing already had us playing “up”, facing a team with an average rating of 2150.

Round 2 Underway. Missing: Team Captain
My assignment was against FM Arthur Shen (2453). Arriving late after wolfing down some much needed lunch, I proceeded to build up a straightforward attacking position. Unfortunately a hasty decision spoiled my advantage, and after a series of exchanges the players agreed on a draw. Actually after the game we were both surprised to learn that we had missed a tactic which would have given Arthur a winning position. At least this game wasn’t 6 hours. However, this could not have been said about the rest of the team, as Levy was left battling on board two after we trailed in the match 2-1. Trying to squeeze blood from a stone, Levy kept us up until 2:30 A.M eating Dominos. Unfortunately his efforts fell short and ended up losing the match by the slimmest of margins, 2.5-1.5.
The next 3 rounds proceeded without much trouble, and Hooztri mowed down the opposing teams with scores of 4-0, 3-1, and 4-0. The final round however, had us paired against a tough team. For the 2nd time in the tournament we found ourselves playing “up”, this time against a team with an average rating of 2190. Despite the rating disadvantage, Hooztri quickly jumped out to a 2.5-0.5 lead, fueled by a quick win on board 2 and major upset on board 4 as Katrina defeated a 2000. I was the last to finish my game against the strong FM Josh Colas (2430), winning a nice game to give us a 3.5-.5 win.
The final tally gave us a 5-1 record with 19.5/24 match points. The breakdown was as follows:
Bd1: 5 Bd2: 5.5 Bd3: 4.5 Bd4: 4.5
Katrina’s result was particularly impressive as she raised her rating to a peak of 1686. If you are wondering about this aspect of our team’s composition, Katrina is a student of Alexis (our board 3) and attends the famous I.S 318 middle school, where I work weekly. A special thank you should go out to Katrina’s dad, Eric, for fun times and his support during the event, both big and small.
In the end, another year of USATE is in the books. I believe this is already my 6th time playing in this event, if not more. As always, Parsippany leaves a pleasant aftertaste both on and off the chess board. You can be sure to watch out for the University of Hooztri next year!