No new tournaments again so I will take another trip down memory lane. Actually, that is not exactly true as I played a Blitz tournament last weekend. The invitation only event, known as “Gelfand Cup” boasted an all master field. The 10 player round-robin event was won by GM Alex Lenderman with an 8.5/9 score. Second place was taken by GM Leonid Yudasin with 7.5/9, while I had a relatively distant 6/9, good enough for a tie for 3rd. I actually had a pretty good start at 4/5, beating Yudasin and IM Yury Lapshun, but a 2/4 score in the 2nd half wasn’t impressive. Nevertheless, blitz is blitz and blitz is fun….plus due to the generous funding I was able to snag a cash prize nonetheless.
Anyway, I wanted to share an excerpt from one of my older games.
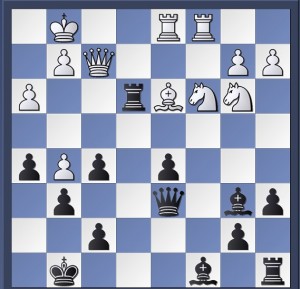
The above position arose during the 8th round of the 2013 edition of the New York International. My opponent was the famous IM Jay Bonin. Without calculating any variations, the position above appears to be definitely better for Black. With a powerful Knight on e4, two bishops, and chances on the Kingside, Black is poised for a positive result. Furthermore, although White’s pieces are developed on decent squares, it seems difficult for him to come up with a plan. Nevertheless….
1. d5?!/!?
This move looks like the perfect move to make sense of White’s pieces. So why the assortment of exclams and question marks? When I first saw d5 played on the board, I had a moment of confusion as I thought I could simply reply with 1…c5(?!). Left unperturbed I would simply continue with Bd6 (and maybe b5). Should that happen, Black will achieve such a harmonious position that it would only occur in the most pleasant of chessplayers’ dreams. White is really struggling to create any coherent plan. Meanwhile, Black’s pieces are positioned perfectly and I can slowly prepare a strike on the Kingside. Besides obvious Qe5 ideas, I can also try some h4-g5-g4 plans. Most importantly, White is reduced to a concerned bystander. Unfortunately, 1..c5 doesn’t work! After 1. d5 c5 White has 2. d6! with ideas of Nd5 as well as Nxe4. The subsequent opening of the position will be to White’s advantage as his pieces are fully developed. For example, 2…Bxd6 3. Bxe4 fxe 4. Nxe4 (Diagram) and the difference between White’s piece activity (from the 1st diagram) is night and day.
So there it is. 1. d5 is a great positional move that aims to exploit White’s only advantage in the position (quantity of development). As any strong positional move, it is backed up by a cute tactical point. But wait! Well, at least that’s what I said to myself after spotting the pitfall that is named 1…c5. I should mention that for about the past 5 moves, I had continuously been looking to land a knockout blow on the Kingside. After all, all my pieces are taking aim at White’s king… and White’s king doesn’t even have any defenders around! So I thought and I thought; I think I may have had 30 minutes after 1. d5 but ended up only with 5 when I played my move. Fortunately, my suspicious investment ended up paying off. There is a tactical operation in this position! Actually, it takes the default engine in my ChessBase (the ancient Fritz 11) a whooping 21 seconds to give Black a favorable evaluation.
1… Ng5
2. Qe2 Qd6!
Here we go. The main points are unfolding
3. f4
Now it was my opponent’s turn to be confused. The threats have ended and Black has to deal with the hanging Knight and the repercussions of poor development after dxc6.
3… Bb6!

This is the main point. White has been forced to compromise the e3-square and now faces a dilemma. However, Black’s success is not yet obvious. Jay makes me prove my variation with the principled:
4. fxg5?
Practically, this move makes sense as it is the principled way to make Black explain the neglect of the Ng5. Objectively, this move loses.
4. Kh1! was the only way to stay in the game. Actually this powerful move puts a damper on Black’s plans. After 4…Rxe3 5. Qf1 (keeping f4 under control) Nh7, Black has an extra pawn, two bishops in an open position, and White’s king is exposed. However, Black is unlikely to be able to make use of any of these advantages if I am not able to develop properly and negate the activity of White’s pieces along the open files. The computer remains optimistic about Black’s chances, but the next 5 moves may look difficult for Black to make. Saying that, upon unraveling Black can look forward to a great game.
4… Rxe3
5. Qf2
The Queen shields the King from any nasty discovered check(mate)s. It looks like White is pretty safe right now. The immediate 5…Re1+ gives up too much material. 6. Rxe1 Bxf2+ 7. Kf2 and the Rook+2N more than compensate for the Queen deficit. Fortunately, I do not have to cash in on my pin just yet.
5… cxd5!
I was proud of this move, especially due to the idea it’s connected to and the fact that I saw it well in advance. Nevertheless even my brain-dead Fritz11 offers the alternative win 5…Qb4. But it does admit that 5…cd is stronger! Now since the Bb6 is defended, I am threatening Rxd3.
6. Na4
The final line of defense. White threatens Nxb6, but also Nc5 to plug the a7-g1 diagonal. Again, this resource had to be spotted and refuted in advance.
6… Re1+
This wasn’t good before, but now things have changed!
7. Rxe1 Bxf2+
8. Kxf2 Qf4+
Loose pieces drop off.
9. Kg1 Qxa4
and soon it was 0-1